LTSP4.2 no Debian Lenny: mudanças entre as edições
(dns mudei) |
Sem resumo de edição |
||
| (Uma revisão intermediária por um outro usuário não está sendo mostrada) | |||
| Linha 6: | Linha 6: | ||
Caso onde esteja a internet veja muito ruim de velocidade, aqui vai os pacotes .deb utilizados na instalação. | Caso onde esteja a internet veja muito ruim de velocidade, aqui vai os pacotes .deb utilizados na instalação. | ||
# wget http://idsorocaba. | # wget http://idsorocaba.batemacumba.net/debian_lenny_pacotes_deb/pacotes_deb_ltsp42_lenny.tar.gz | ||
# tar zxvf pacotes_deb_ltsp42_lenny.tar.gz | # tar zxvf pacotes_deb_ltsp42_lenny.tar.gz | ||
# dpkg -i *.deb | # dpkg -i *.deb | ||
| Linha 12: | Linha 12: | ||
Vamos instalar o ltsp-utils, com ele instalamos e configuramos o LTSP 4.2.<br> | Vamos instalar o ltsp-utils, com ele instalamos e configuramos o LTSP 4.2.<br> | ||
http://ltsp.mirrors.tds.net/pub/ltsp/utils/ ou<br> | http://ltsp.mirrors.tds.net/pub/ltsp/utils/ ou<br> | ||
http://idsorocaba. | http://idsorocaba.batemacumba.net/ltsp/utils/<br> | ||
# wget http://ltsp.mirrors.tds.net/pub/ltsp/utils/ltsp-utils-0.25-0.tgz | # wget http://ltsp.mirrors.tds.net/pub/ltsp/utils/ltsp-utils-0.25-0.tgz | ||
# tar xvf ltsp-utils-0.25-0.tgz | # tar xvf ltsp-utils-0.25-0.tgz | ||
| Linha 316: | Linha 316: | ||
Configuração originalmente em: [http://idsorocaba. | Configuração originalmente em: [http://idsorocaba.batemacumba.net/index.php?n=Main.DebianLennyLtsp42 Instalação LTSP4.2 no Debian Lenny] | ||
[[Categoria:Redes]] | [[Categoria:Redes]] | ||
[[Categoria:Linux]] | [[Categoria:Linux]] | ||
[[Categoria:Debian]] | |||
Edição atual tal como às 18h23min de 9 de março de 2015
Para o funcionamento do LTSP, é preciso alguns programas.
# apt-get install dhcp3-server tftpd-hpa portmap nfs-kernel-server
Pra usar o ltsp-utils instalar bibliotecas do perl
# apt-get install libwww-perl libhtml-parser-perl libhtml-tagset-perl libhtml-tree-perl liburi-perl
Caso onde esteja a internet veja muito ruim de velocidade, aqui vai os pacotes .deb utilizados na instalação.
# wget http://idsorocaba.batemacumba.net/debian_lenny_pacotes_deb/pacotes_deb_ltsp42_lenny.tar.gz
# tar zxvf pacotes_deb_ltsp42_lenny.tar.gz
# dpkg -i *.deb
Vamos instalar o ltsp-utils, com ele instalamos e configuramos o LTSP 4.2.
http://ltsp.mirrors.tds.net/pub/ltsp/utils/ ou
http://idsorocaba.batemacumba.net/ltsp/utils/
# wget http://ltsp.mirrors.tds.net/pub/ltsp/utils/ltsp-utils-0.25-0.tgz
# tar xvf ltsp-utils-0.25-0.tgz
# cd ltsp-utils
# sh install.sh
Installing ltspadmin
Installing ltspcfg
Installing ltspinfo

Installation of ltsp-utils complete
No Debian Lenny o pacote ltsp-utils não é mais oficial, por isso pegar o fonte para instalar.
Sobre Instalando a partir da .ISO
Obter a .iso
Montar .Iso do LTSP4.2
# mount -o loop ltsp-4.2u2-0.iso /mnt
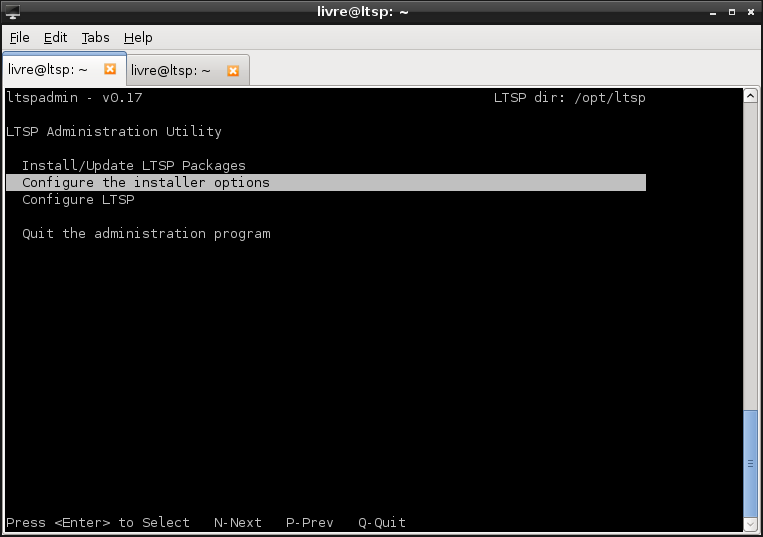
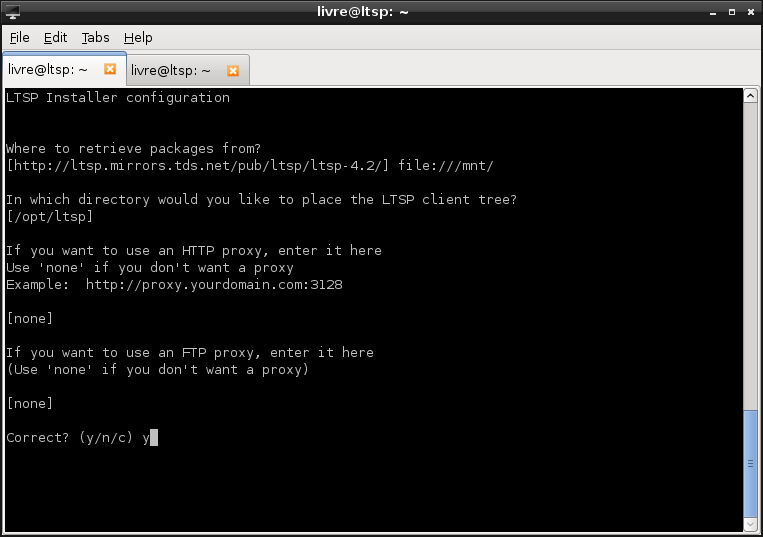
Na tela do ltspadmin vamos primeiro em Configure the installer options
Em Where to retrieve packages from? vamos trocar e colocar:
file:///mnt/
na opção abaixo In which directory would you like to place the LTSP client tree?
[/opt/ltsp]
Indicado manter o padrão e pra outras pode deixar em branco e dar enter.
Para instalar vamos em Install/Update LTSP Packages
Tecle A para selecionar todos arquivos para instalação
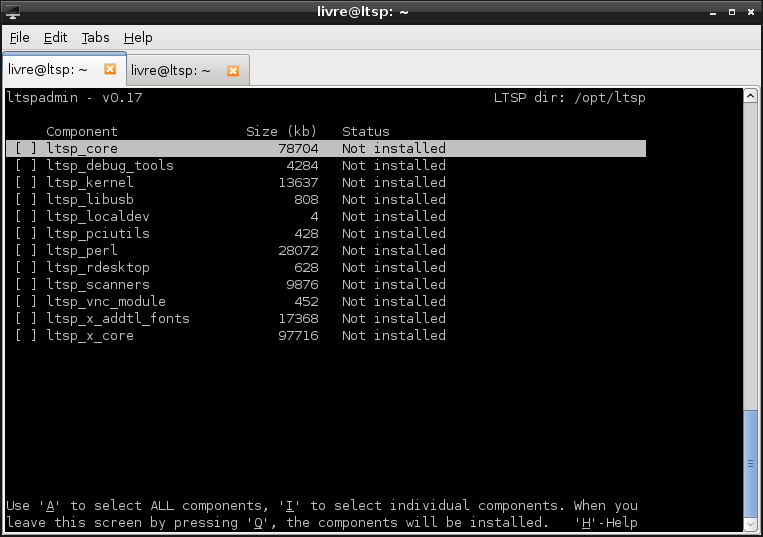
e Q para começar o Download
Instalou e tecle Enter para continuar
Com LTSP já instalado, falta somente configurar...
mas antes vamos editar/verificar se alguns arquivos estão como devem.
Abra o:
# nano /etc/default/tftpd-hpa
(pode usar seu editor preferido...vi, vim, pico, emacs e etc...)
E deixe o arquivo tftpd-hpa deste jeito...
#Defaults for tftpd-hpa
RUN_DAEMON="yes"
OPTIONS="-l -s /tftpboot"
Salva e pronto.
O servidor deve ter duas placas de rede, vamos usar aqui no exemplo a eth1 com ip 192.168.20.1 para o LTSP
Para isso vamos abrir o:
#nano /etc/network/interfaces
E colocar a seguinte configuração na eth1 deste jeito.
auto eth1
iface eth1 inet static
        address   192.168.20.1
        netmask   255.255.255.0
        network   192.168.20.0
        broadcast 192.168.20.255
reiniciando a rede:
#/etc/init.d/networking restart
Para ver como esta a configuração atual do LTSP
#ltspcfg
tecle S e veja se tem tudo instalado
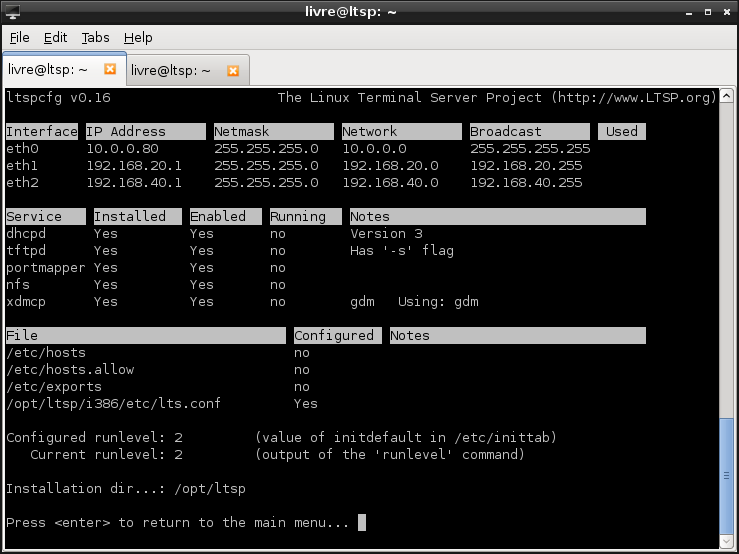
Maiores informações:
2.5. Exibindo a configuração atual
http://ltsp.mirrors.tds.net/pub/ltsp/docs/ltsp-4.1-ptbr.html#AEN641
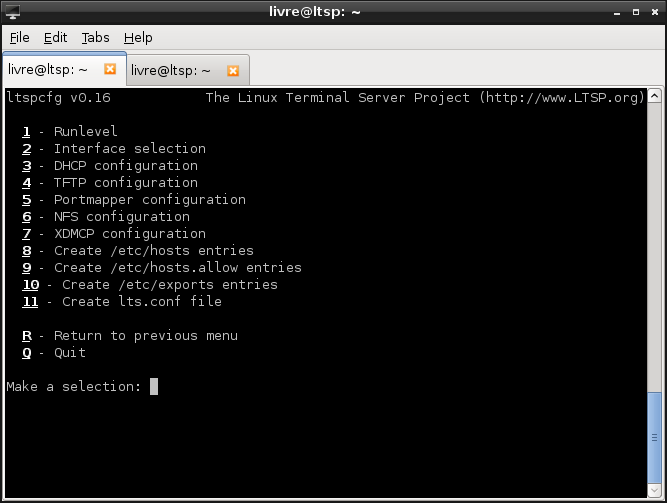
Em #ltspcfg Tecle C (configure)
2.3. Configurando os serviços necessários ao LTSP
http://ltsp.mirrors.tds.net/pub/ltsp/docs/ltsp-4.1-ptbr.html#AEN443
1 - Runlevel
e mude o Runlevel para 5
2 - Interface selection
e escolha a interface/placa de rede que LTSP vai usar.
Vamos aqui usar a eth1 que antes já configuramos
3 - DHCP configuration
aqui criei o arquivo dhcpd.conf
Do you want to build a dhcpd.conf file (y/n) ? Y
em outro Terminal/Aba faça
#mv /etc/dhcp3/dhcpd.conf.sample /etc/dhcp3/dhcpd.conf
E agora edite o dhcpd.conf
#nano /etc/dhcp3/dhcpd.conf
e procure por:
option domain-name "your_domain.org"; # You really should fix this
e coloque o domínio da sua rede.
Sugestão usar "ltsp"
option domain-name "ltsp"; # You really should fix this
procure a linha - subnet 192.168.0.0 netmask 255.255.255.0
subnet 192.168.0.0 netmask 255.255.255.0 {
range 192.168.0.100 192.168.0.199;
if substring (option vendor-class-identifier, 0, 9) = "PXEClient" {
filename "/lts/2.6.16.1-ltsp-1/pxelinux.0";
}
else{
filename "/lts/vmlinuz-2.6.16.1-ltsp-1";
}
}
Verifica se esta com o ip de sua rede configurada na eth1.
Em um Terminal/Aba execute: ls /tftpboot/lts e veja o retorno.
# ls /tftpboot/lts

2.6.17.3-ltsp-1 vmlinuz-2.6.17.3-ltsp-1
No dhcpd.conf criado esta escrito a versão - 2.6.16.1-ltsp-1 - só que ltsp tem instalado a:
2.6.17.3-ltsp-1.
Mude para 2.6.17.3-ltsp-1.
Agora faça as mudanças no option domain-name, subnet e no filename -, o dhcp.conf deve ficar assim.
# dhcpd.conf

 ddns-update-style ad-hoc;


 option subnet-mask 255.255.255.0;
 option broadcast-address 192.168.20.255;
 option routers 192.168.20.1;
 option domain-name-servers 208.67.222.222;
 option domain-name "ltsp"; # You really should fix this
 option option-128 code 128 = string;
 option option-129 code 129 = text;


 get-lease-hostnames true;
 next-server 192.168.20.1;
 option root-path "192.168.20.1:/opt/ltsp/i386";


 subnet 192.168.20.0 netmask 255.255.255.0 {
 range 192.168.20.100 192.168.20.110;
 if substring (option vendor-class-identifier, 0, 9) = "PXEClient" {
 filename "/lts/2.6.17.3-ltsp-1/pxelinux.0";
 }
 else{
 filename "/lts/vmlinuz-2.6.17.3-ltsp-1";
 }
 }
#
# If you need to pass parameters on the kernel command line, you can
# do it with option-129. In order for Etherboot to look at option-129,
# you MUST have option-128 set to a specific value. The value is a
# special Etherboot signature of 'e4:45:74:68:00:00'.
#
# Add these two lines to the host entry that needs kernel parameters
#
# option option-128 e4:45:74:68:00:00; # NOT a mac address
# option option-129 "NIC=ne IO=0x300";
#
Feito tudo...execute.
#/etc/init.d/dhcp3-server restart
Voltar ao Terminal/Aba que tem o Menu de Configure
4 - TFTP configuration
coloque **Y** (yes ) para ligar/enabled o TFTP
Em outro Terminal/Aba antes edite:
#nano /etc/inetd.conf
e procure pela linha.
#:BOOT: Tftp service is provided primarily for booting.  Most sites
# run this only on machines acting as "boot servers."
tftp           dgram   udp     wait    root  /usr/sbin/in.tftpd /usr/sbin/in.tftpd -s /tftpboot
e deixe como esta acima. ...-s /tftpboot
Bem continuando a instalação....
5 - Portmapper configuration
coloque Y (yes) para ligar/enabled.
6 - NFS configuration
coloque Y (yes) para ligar/enabled.
7 - XDMCP configuration
coloque Y (yes) para ligar/enabled.
8 - Create /etc/hosts entries
9 - Create /etc/hosts.allow entries
10 - Create /etc/exports entries
11 - Create lts.conf file
Nesta 4 seleções coloque Y (yes) para que o ltspcfg criar as entradas de configurações em cada arquivo e crie o arquivo lts.conf
Abaixo vamos editar algumas configurações que ltspcfg criou.
8 - Create /etc/hosts entries
Se o arquivo #cat /etc/hosts - tiver como retorno um parecido com abaixo
## LTSP-begin ##
#
# The lines between 'LTSP-begin' and 'LTSP-end' were added
# on: Qua Abr 18 23:55:07 2007, by the ltspcfg configuration tool.
# For more information, visit the LTSP homepage
# at http://www.LTSP.org
#
......
192.168.20.84           ws084.ltsp      ws084
192.168.20.85           ws085.ltsp      ws085
192.168.20.86           ws086.ltsp      ws086
192.168.20.87           ws087.ltsp      ws087
......
esta tudo ok
9 - Create /etc/hosts.allow entries
Edite o arquivo #nano /etc/hosts.allow
bootpd:     0.0.0.0
in.tftpd:   192.168.20.0
portmap:    192.168.20.0
mude para ip que tu tem configurado no seu servidor. No caso aqui: 192.168.20.1
bootpd:     0.0.0.0
in.tftpd:   192.168.20.1
portmap:    192.168.20.1
Salve e pronto.
10 - Create /etc/exports entries
Edite o arquivo #nano /etc/exports - mudando para o ip do servidor. Deve ficar assim:
## LTSP-begin ##
#
# The lines between 'LTSP-begin' and 'LTSP-end' were added
# on: Qua Abr 18 23:57:57 2007, by the ltspcfg configuration tool.
# For more information, visit the LTSP homepage
# at http://www.LTSP.org
#
/opt/ltsp                 192.168.20.1/255.255.255.0(ro,no_root_squash,sync,no_subtree_check)
#/var/opt/ltsp/swapfiles   192.168.20.1/255.255.255.0(rw,no_root_squash,async,no_subtree_check)
## LTSP-end ##
Pronto....reinicie a maquina e faça os teste nos terminais.
Pelo problema no inetd foi preciso eu reiniciar...mas depois eu fui em ltspcfg e fui ver o S Status (ou #ltspcfg -p) e estava o TFTP rodando e nos terminais funcionou.
Interface IP Address      Netmask         Network         Broadcast        Used
eth0      xxx.xx.xxx.xxx  255.255.252.0   xxx.xx.xxx.x    255.255.255.255
eth1      192.168.20.1    255.255.255.0   192.168.20.0    192.168.20.255  <-----


Service    Installed   Enabled   Running   Notes
dhcpd      Yes         Yes       Yes       Version 3
tftpd      Yes         Yes       Yes       Has '-s' flag
portmapper Yes         Yes       Yes
nfs        Yes         Yes       Yes
xdmcp      Yes         Yes       Yes       gdm   Using: gdm


File                                Configured  Notes
/etc/hosts                          Yes
/etc/hosts.allow                    Yes
/etc/exports                        Yes
/opt/ltsp/i386/etc/lts.conf         Yes


Configured runlevel: 5         (value of initdefault in /etc/inittab)
   Current runlevel: 5         (output of the 'runlevel' command)


Installation dir...: /opt/ltsp


Press <enter> to return to the main menu...
Configuração originalmente em: Instalação LTSP4.2 no Debian Lenny
